“Remember that time is money”, Benjamin Franklin said in 1748. He probably never would have guessed his remark would still be quoted frequently in 2021. But he must have been ahead of his time because even in our digital age, his statement is still true.
If time equals money, it basically means you lose money when you spend too much time on something. In terms of digital advertising, losing time often occurs in the production process. For those who manually create and code HTML5 ads, the process is often complicated, stressful and time-consuming.
The sum of building the first design, sharing drafts, applying feedback, creating all other required sizes and translating them to all applicable regions feels like a never-ending nightmare. And if we have to go with Benjamin Franklin, it’s a costly nightmare too.
.png?width=720&name=time%20is%20money%20(1).png)
Time-saving solutions
Luckily, there are solutions to save time on ad production. With the right tools, the pain of the production process vanishes. Our method of choice here is a Creative Management Platform (CMP). This is a cloud-based, technological solution that helps you build, scale, publish and optimize digital ads. With this, professional-looking HTML5 ads can be created in no time.
To make this more tangible, we have composed a comparison chart, in which you can see the difference in time spent on both manual ad production and ad production with a CMP, including a short comment for each step.
Of course, we know there is no such thing as a ‘fixed process’, so these steps serve as rough examples. It is very likely you and your team members take navigate through this process in a totally different way.
|
Step 1: Create First Design (Master)
Let’s say you are creating a regular HTML5 ad. For this, you often start with creating a master design. This can be used as a basis for all other designs.
|
| If you manually want to create professional-looking, animated HTML5 ads, it’s very important that the designer is multitalented, or that you have several team members at hand (motion designer, developer). Creating interactive elements is rather difficult and coding requires time, so this will at least take half a day. |
Using a CMP empowers your designer to create a professional-looking master design from scratch. Adding interactive elements such as an enlarging CTA at mouse-over can be done with a few clicks. You can also opt for a video background or audio effects. There’s no need for a developer. |
| Time spent: 4 hours |
Time spent: 1 hour |
| Step 2: Share First Design |
| Sharing your ads has to be done manually. You can export the file and send them over for review via email or in a Dropbox. If you want to build a dedicated preview page online, it becomes even more time-consuming. |
With a CMP you can share your ads easily via a dedicated preview page. If desired, you can style your page in your preferred brand look and feel. Uploading and downloading ads is a thing of the past. |
| Time spent: 30 minutes |
Time spent: 5 minutes |
| Step 3: Apply Feedback |
| Depending on the elements in your ad, feedback takes less or more time. If you have various elements in your ads, applying feedback can be very time-consuming since all elements need to be built and coded accordingly. |
When you have gathered all feedback, this can easily be applied to the master design. By dragging-and-dropping new elements or changing the background color with one single click, feedback is handled within no time. |
| Time spent: 2 hours |
Time spent: 30 minutes |
|
Step 4: Create Core Sizes
When the master design is finished, it’s time to scale up and create all required sizes and formats.
|
| Doing this manually, you would need to recreate each ad with different specs, over and over again. Let’s say you need 10 sizes, you would need to rebuild 9 ads in total. 9 times the same manual handlings to make the same ads pixel perfect and animated accordingly. |
In the CMP, you select all required sizes and formats and simply click a button to scale up. The core sizes are automatically created, applying margins and formatting pixel perfect. All sizes are labeled accordingly and saved in the appropriate cloud folder. |
| Time spent: 5 hours |
Time spent: 30 minutes |
| Step 5: Share Design |
| Again, sharing your designs has to be done manually. Export the files and send them over for feedback or place them on your earlier built preview page. |
Sharing your designs in a CMP is done by simply clicking a ‘share’ button. You get a sharing link that displays all sizes and is easily send over for feedback. |
| Time spent: 30 minutes |
Time spent: 5 minutes |
|
Step 6: Make Translations For Each Region
In an ideal situation, you now get approval to translate your designs for all regions. Let’s say you have received all text versions in all required languages. You already created 10 ad sizes, but you have 4 languages you need to apply.
|
| Manual ad production means you have to create 40 ads by copying and pasting the texts in each ad. While this is a very boring, repetitive task, it is important that it happens very accurately, so you have to stay sharp and keep going. |
Simply select the languages and copy-paste the final copy in your master ad. All versions are adjusted automatically. Line breaks and hyphens are applied automatically, grammatically correct and without messing up your design. |
| Time spent: 6 hours |
Time spent: 15 minutes |
|
Step 7: Publishing Your Ads
Your ads are finished. Now, it is time to upload your ads. we assume you want to use these ads for one advertising network or DSP.
|
| Let’s say you have to upload your ad set of 40 versions. This will - if all goes well - require a lot of handlings, such as generating click-tags or click-macros. And when you get an error, you have to do this all over again. And if you want to use your ads on several networks or platforms, uploading takes much, much more time than in this example. |
With a CMP, you don’t have to download and upload your ads. They are directly pushed to your preferred ad network or DSP. You don’t have to worry about exceeding the file size since this is automatically limited. Also, generating click-tags is a thing of the past. With third-party tags you can even update your ads in real-time, to avoid ad-fatigue or underperformance. |
| Time spent: 5 hours |
Time spent: 5 minutes |
| Total time spent: 23 hours |
Total time spent: 2,5 hours |
Saving valuable time
As you can see, the digital advertising production process is a time-consuming endeavor. When you do it manually, that is. We have to say we have used fairly ‘diplomatic’ time frames here. If you A/B test your ads or when you often receive a considerable amount of feedback on your designs, the total time spent is often much, much higher.
Looking at this comparison, you can see that deciding to transfer your production process to a Creative Management Platform could easily save you 90% of your time. When you take the hourly fees of your agency or the general value of your time into account, this 90% extra time spent suddenly becomes very expensive.
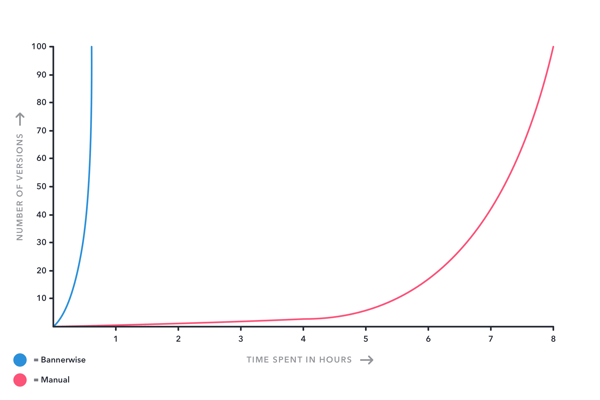
And there’s more proof as to why using a CMP is a time-saving solution. Take a look at this graph. As you can see, time spent increases exponentially with each version you create manually. But scaling up to hundreds of versions isn’t that much of an effort when you use a CMP.
So for now, let’s go back to 1748 and take Benjamins Franklin’s statement into account again. Then, ask yourself that one question: are you ready to save yourself some time and money?